مقدّمة تدريب موديول المحاسبة في ERPNext / ERPNext Accounts Module – Intro
هذه الصفحة هي دليل تمهيدي مخصّص للمتدربين لدى NEXTFUTURE، لشرح دورة العمل المحاسبية الكاملة في نظام ERPNext؛ من لحظة تسجيل طلب شراء أو طلب مبيعات، مرورًا بالفواتير، وانتهاءً بالقيود اليومية، القبض والدفع، والتقارير والمطابقات البنكية.
التركيز في هذا التدريب على التطبيق العملي خطوة بخطوة، باستخدام بيئة ERPNext الحقيقية، بحيث يفهم المتدرب الصورة الكاملة للحركات المحاسبية، وليس فقط شاشة إدخال البيانات.
1. ما الذي ستتعلّمه في هذا الموديول؟ / What will you learn in this module?
موديول المحاسبة في ERPNext هو العمود الفقري للنظام المالي في شركتك. خلال هذه الدورة سيقوم فريق NEXTFUTURE بأخذك في رحلة عملية تغطي جميع الحركات الأساسية التي يمرّ بها أي نظام محاسبي سليم، مع تحويلها إلى خطوات واضحة داخل النظام.
- فهم مخطط الحسابات وكيفية قراءة وتصميم هيكل الحسابات بما يناسب شركتك.
- تطبيق دورة الشراء الكاملة: من طلب الشراء حتى فاتورة الشراء وسند الدفع ومطابقة المورد.
- تطبيق دورة البيع الكاملة: من عرض السعر وطلب المبيعات حتى فاتورة المبيعات وسند القبض ومطابقة الزبون.
- تسجيل القيود اليومية اليدوية والتسويات المحاسبية (مخصصات، اهتلاكات، فروق عملات… إلخ).
- إدارة حركات القبض والدفع النقدية والمصرفية باستخدام مستند Payment Entry.
- استخدام التقارير الأساسية: دفتر الأستاذ العام، أعمار الديون، أرصدة الحسابات، والتقارير البنكية.
- مراجعة ومطابقة الحسابات بشكل دوري، وفهم أثر كل مستند على القوائم المالية.
هذا المحتوى مكتوب بصيغة تعليمية عملية، بحيث يمكن استخدامه كمرجع دائم بعد انتهاء التدريب، أو كأساس لمادة تعليمية داخلية في الشركة.
2. دورة المستندات المالية في ERPNext – من الطلب إلى القيد / Financial Document Flow – From Request to Entry
قبل الدخول في تفاصيل الشاشات، نحتاج إلى رؤية الصورة الكبيرة: كيف تتحرك البيانات المالية في النظام من أول خطوة حتى آخر تقرير. يمكن تخيل موديول المحاسبة كمجرى يمر بالمراحل التالية:
- مرحلة الطلبات (طلبات شراء – طلبات مبيعات).
- مرحلة حركات المخزون (استلام – تسليم).
- مرحلة الفواتير (فواتير شراء – فواتير مبيعات).
- مرحلة القبض والدفع (Payment Entry).
- مرحلة التقارير والمطابقة (دفتر الأستاذ، كشف حساب، مطابقة بنكية…إلخ).
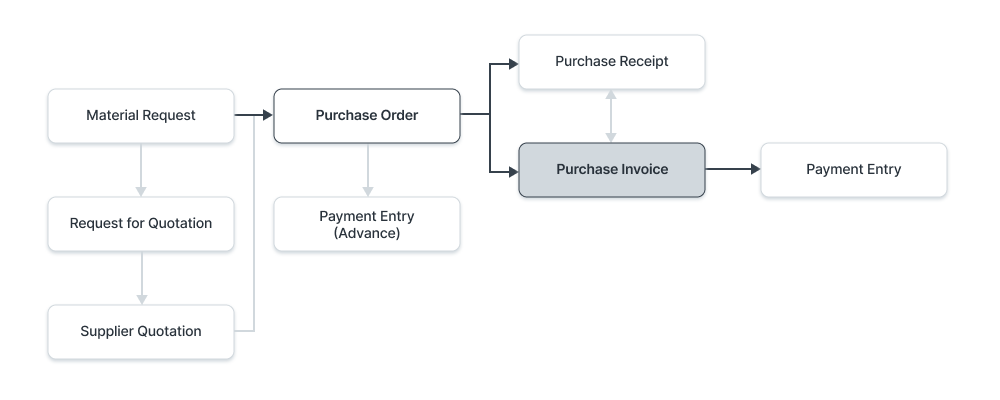
سيتم تطبيق منطق مشابه في جانب المبيعات: عرض سعر / طلب مبيعات → تسليم → فاتورة مبيعات → سند قبض. في كل مرحلة يقوم النظام بإنشاء قيود محاسبية تلقائية، وتتحرك الأرصدة بشكل مترابط عبر الحسابات والمخزون.
3. تجهيز بيئة المحاسبة قبل إدخال الحركات / Preparing the Accounting Environment
من أكبر الأخطاء في تطبيق أي نظام ERP أن نبدأ بإدخال فواتير وسندات قبل التأكد من أن الأساس المحاسبي مضبوط. في هذا الجزء نضع إطارًا لما سنقوم بإعداده معكم قبل بدء الحركات اليومية.
3.1 مخطط الحسابات (Chart of Accounts)
مخطط الحسابات هو شجرة الحسابات الرئيسية والفرعية التي تُبنى عليها جميع القيود. في ERPNext يأتي النظام مع مخططات جاهزة يمكن تخصيصها (حسب الدولة أو نوع النشاط)، لكن دور NEXTFUTURE هنا هو:
- مراجعة الهيكل الحالي للحسابات لدى الشركة.
- اقتراح إعادة هيكلة مبسّطة (إن لزم) تُراعي التقارير المطلوبة والفصل بين الأنشطة.
- ربط أنواع المستندات بالحسابات المناسبة (حساب المبيعات، المخزون، تكلفة المبيعات، المصروفات…إلخ).
كلما كان مخطط الحسابات أوضح وأقل تعقيدًا، كان تحليل التقارير المالية أسهل بكثير. الهدف أن يأخذ المحاسب القرار بسهولة، لا أن يتوه داخل شجرة حسابات معقدة.
3.2 بيانات الأطراف (العملاء والموردون والموظفون)
قبل استخدام فواتير الشراء والبيع، سنقوم بإعداد كروت الأطراف الأساسية:
- إنشاء Customers مع ربط كل عميل بالحساب المناسب (حساب زبائن محليين، زبائن خارجيين…).
- إنشاء Suppliers مع ربط كل مورد بحساب الموردين المناسب.
- تعريف الحسابات البنكية وصناديق النقدية كحسابات داخل مخطط الحسابات وربطها بمستند Payment Entry.
- تعريف بعض الموظفين إن كان هناك تعاملات سلف وذمم موظفين.
3.3 الإعدادات العامة للمحاسبة
في جلسة الإعداد الأولي سنراجع أهم الإعدادات في Accounts Settings و Company مثل:
- العملة الأساسية للشركة (مثلاً: دينار أردني) والعملة الافتراضية للفواتير.
- إعدادات السنة المالية، وعدد الفترات (سنوي، ربع سنوي…إلخ).
- ربط الحسابات الافتراضية للضرائب، الخصومات، الفوائد، فروق العملة…إلخ.
- تفعيل إعدادات Multi Currency إن كانت الشركة تتعامل بأكثر من عملة.
بعد الانتهاء من هذه الخطوات يكون النظام جاهزًا لاستقبال الحركات اليومية دون الحاجة إلى تعديل جذري في منتصف السنة المالية.
4. دورة الشراء العملية: من طلب الشراء إلى سند الدفع / Purchase Cycle – From Request to Payment
في هذه الوحدة يتعلم المتدرب كيف تتحول احتياجات المخزون أو الخدمات إلى مستندات مالية متكاملة، وكيف يقوم النظام بإنشاء القيود تلقائيًا مع كل خطوة.
4.1 خطوات دورة الشراء
- إصدار طلب مواد (Material Request) أو طلب شراء (Purchase Order) حسب سياسة الشركة.
- استلام البضاعة فعليًا وتسجيلها في مستند Purchase Receipt (اختياري حسب السياسة).
- استقبال فاتورة المورد وتسجيلها في Purchase Invoice.
- سداد الفاتورة عبر مستند Payment Entry نقدًا أو شيكًا أو تحويلًا بنكيًا.
4.2 فاتورة الشراء (Purchase Invoice)
تعتبر فاتورة الشراء المستند الأساسي الذي يربط بين المورد، المخزون، والمصروفات. عند حفظها واعتمادها يقوم النظام بتحديث أرصدة حسابات المورد والمخزون والتكاليف تلقائيًا.
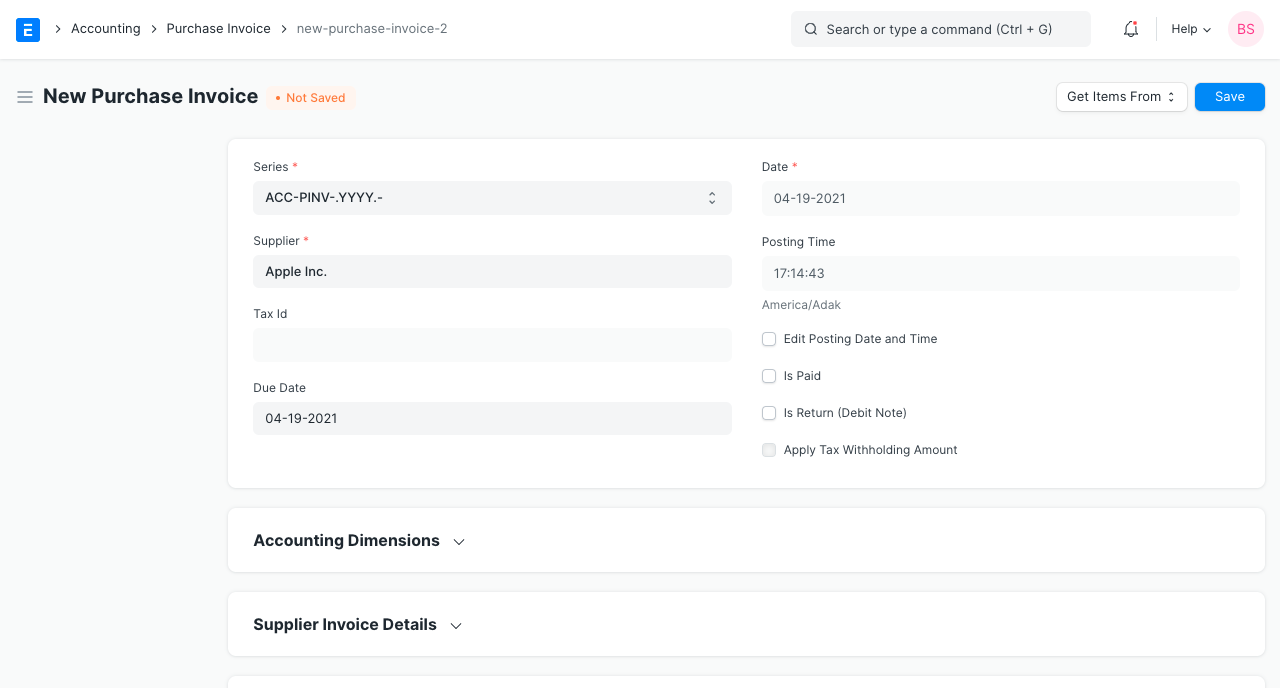
4.2.1 إعداد فاتورة شراء جديدة – خطوات عملية
- من شجرة الوحدات اختر: Accounting > Accounts Payable > Purchase Invoice.
- اضغط على New لإنشاء فاتورة جديدة.
- اختر المورد وتأكد من جلب عنوانه وبيانات الضريبة تلقائيًا.
- اضبط تاريخ الفاتورة وتاريخ الاستحقاق إن وجد.
-
في جدول Items أضف المواد أو الخدمات:
- اختيار الصنف من قائمة الأصناف.
- تحديد الكمية وسعر الوحدة.
- تحديد المستودع الذي ستدخل إليه البضاعة.
- إضافة الضرائب والرسوم في جدول Taxes and Charges حسب إعدادات الضريبة في الشركة.
- المراجعة النهائية والتحقق من الإجمالي.
- الضغط على Save ثم Submit لاعتماد الفاتورة وإنشاء القيد.
الهدف: إدخال أول فاتورة شراء لمورد محلي مع ضريبة مبيعات، ومراجعة أثرها على حساب المورد والمخزون.
- المورد: شركة توريد قرطاسية.
- الصنف: ورق طباعة A4 – 10 رزم.
- السعر للوحدة: 3 دنانير، الضريبة: 16%، طريقة الدفع لاحقًا.
- بعد اعتماد الفاتورة، افتح General Ledger وشاهد القيد الذي تم إنشاؤه تلقائيًا.
4.3 الربط بين الاستلام والفاتورة
في الشركات التي تعتمد سياسة استلام البضاعة قبل إصدار فاتورة الشراء، يتم أولًا عمل Purchase Receipt ثم تُنشأ فاتورة الشراء لاحقًا من هذا الاستلام.
- يساعد هذا الأسلوب على مطابقة الكميات المستلمة مع الفاتورة.
- يقلل من احتمالية الخطأ في الأسعار أو الكميات.
- يتيح تسجيل الالتزام بالمورد حتى لو لم تصل الفاتورة الورقية بعد.
4.4 سند الدفع (Payment Entry) عن فاتورة شراء
بعد اعتماد فاتورة الشراء يبقى على الشركة التزام مالي تجاه المورد. عند السداد، نستخدم مستند Payment Entry من نوع Pay ونربطه بفاتورة الشراء؛ فيقوم النظام بتحديث رصيد المورد وإغلاق الفاتورة.
سننفّذ معًا سيناريوهات دفع مختلفة (سداد نقدي، سداد من حساب بنكي، دفعة جزئية، دفعة مقدمة قبل الفاتورة)، وسنقارن أثر كل سيناريو على التقارير.
5. دورة البيع العملية: من طلب المبيعات إلى سند القبض / Sales Cycle – From Sales Order to Receipt
جانب المبيعات هو قلب الإيرادات. في ERPNext تُدار دورة البيع بطريقة مشابهة للشراء، لكن من منظور الزبون بدل المورد. في هذه الوحدة سنتعامل مع مستندات مثل Sales Order و Sales Invoice وسندات القبض.
5.1 خطوات دورة البيع
- إصدار Quotation (إن لزم) أو مباشرة Sales Order.
- تحويل الطلب إلى Delivery Note لتأكيد تسليم البضاعة.
- إنشاء Sales Invoice مرتبطة بالطلب أو التسليم.
- استلام المبلغ عبر Payment Entry من نوع Receive.
5.2 فاتورة المبيعات (Sales Invoice)
على عكس فاتورة الشراء، تمثل فاتورة المبيعات دينًا على الزبون وإيرادًا للشركة. عند اعتمادها يقوم النظام بتحديث حسابات الذمم المدينة وحسابات المبيعات والمخزون.
5.2.1 إعداد Sales Invoice – خطوات عملية
- من القائمة اختر: Accounting > Accounts Receivable > Sales Invoice.
- اضغط New، ثم اختر الزبون المراد إصدار الفاتورة له.
- تحديد تاريخ الفاتورة وتاريخ الاستحقاق.
-
في جدول Items أضف المواد أو الخدمات المطلوبة:
- اختيار الأصناف والكمية.
- تحديد سعر البيع وقائمة الأسعار (Price List) إن وجدت.
- اختيار المستودع الذي ستخرج منه البضاعة إن كانت الفاتورة تحدث حركة مخزون.
- إضافة الضرائب والخصومات حسب سياسة البيع.
- مراجعة الإجمالي الكلي، ثم Save وSubmit.
- الزبون: متجر تجزئة محلي.
- الصنف: شاشة عرض – 5 قطع، بسعر 120 دينار للقطعة.
- خصم عام 5% على الفاتورة، وضريبة 16%.
- الدفعة ستكون بعد 30 يومًا، لذا نترك الفاتورة كـ Unpaid.
- بعد الحفظ والاعتماد، افتح Customer Ledger وشاهد الرصيد الجديد للزبون.
5.3 سند القبض (Payment Entry – Receive)
عندما يدفع الزبون جزءًا أو كل المبلغ، نقوم بإنشاء سند قبض من نوع Payment Entry (Receive) وربطه بالفاتورة. يمكن أن يكون الدفع نقدًا، شيكًا، تحويلًا بنكيًا، أو من خلال بوابة دفع إلكترونية.
خلال التدريب سنوضح الفرق بين:
- سند قبض مرتبط بفاتورة معينة (تسوية مباشرة للفاتورة).
- سند قبض كتسوية Advance قبل إنشاء الفاتورة واستخدامه لاحقًا.
- سند قبض عام لحساب معين (دون ربط بفواتير)، وتأثيره على التقارير.
6. القيود اليومية والتسويات المحاسبية في ERPNext / Journal Entries & Adjustments
بالرغم من أن معظم القيود يتم إنشاؤها تلقائيًا من الفواتير وسندات القبض والدفع، يبقى هناك دائمًا حاجة إلى قيود يدوية للتسويات الخاصة، مثل المخصصات والفوائد وفروق العملة والتسويات الختامية.
6.1 متى نستخدم Journal Entry؟
- تسجيل قيود افتتاحية عند بداية استخدام النظام.
- إثبات مخصصات (ديون مشكوك في تحصيلها، مكافآت…إلخ).
- تصحيح أخطاء في قيود سابقة بطريقة محاسبية صحيحة.
- إثبات مصاريف أو إيرادات مستحقة لم تُسجل بعد.
- إثبات قيود اهتلاك الأصول الثابتة (إن لم تستخدم موديول الأصول الآلي).
6.2 مكوّنات مستند Journal Entry
- Posting Date: تاريخ تأثير القيد على الدفاتر.
- Reference Number / Reference Date: مرجع خارجي (شيك، سند، مستند ورقي).
- Accounts Table: يحتوي على الصفوف المدينة والدائنة.
- User Remark: شرح موجز للقيد يُستخدم لاحقًا في التقارير.
6.3 مثال – قيد مخصص ديون مشكوك في تحصيلها
نفترض أن الشركة قررت تكوين مخصص بنسبة 5% من رصيد أحد العملاء:
- مدين: مصروف مخصص ديون مشكوك في تحصيلها.
- دائن: مخصص ديون مشكوك في تحصيلها (حساب ضمن الالتزامات أو خصم من الذمم).
- افتح Journal Entry من موديول المحاسبة.
- حدد نوع القيد كـ Journal Entry عادي.
- أدخل حساب المصروف كمدين، وحساب المخصص كدائن بقيمة المخصص.
- اكتب شرحًا واضحًا في حقل User Remark مثل: «تكوين مخصص ديون عن عميل X بنسبة 5%».
- احفظ واعتمد القيد، ثم تابع أثره في Trial Balance.
6.4 فروق العملة وإعادة التقييم
للشركات التي تتعامل بعملات متعددة، يمكن استخدام قيود خاصة لتسجيل فروق سعر الصرف عند السداد أو في نهاية الفترة. في التدريب سنناقش:
- الفرق بين Exchange Gain or Loss الناتج عن سداد فعلي، وExchange Rate Revaluation كإعادة تقييم للأرصدة في نهاية الفترة.
- كيف يظهر الفرق في قائمة الدخل.
- أفضل الممارسات لتقليل عدد القيود اليدوية من خلال استخدام إعدادات النظام.
7. إدارة النقدية: سندات القبض والدفع (Payment Entry) / Cash Management – Receipts & Payments
مستند Payment Entry هو نقطة الربط بين الفواتير والحسابات البنكية والصناديق النقدية. من خلاله تتم عملية تسوية الفواتير وإغلاق الذمم.
7.1 أنواع Payment Entry
- Receive: سند قبض من زبون أو طرف آخر.
- Pay: سند دفع لمورد أو جهة أخرى.
- Internal Transfer: تحويل بين حسابات داخلية (مثلاً من صندوق إلى بنك).
7.2 مكوّنات سند القبض/الدفع
- حقل Party Type وParty (عميل – مورد – موظف…إلخ).
- حساب Paid From (في سند الدفع) أو Paid To (في سند القبض).
- العملة، المبلغ، وسعر الصرف إن كان الحساب بعملة غير عملة الفاتورة.
- جدول الربط بالفواتير (References)، حيث يتم تحديد الفواتير التي يجري تسويتها بهذا السند.
7.3 سيناريوهات تدريب على Payment Entry
- اختيار نوع المستند: Pay.
- Party Type = Supplier، تحديد المورد.
- Paid From = حساب البنك، Paid To = حساب المورد (أو دفعة إلى).
- من جدول References يتم جلب فواتير المورد المفتوحة، وتحديد الفاتورة بالكامل.
- اعتماد السند، ثم مراجعة حساب المورد في Supplier Ledger.
- نوع السند: Receive.
- تحديد العميل وحساب القبض (صندوق أو بنك).
- اختيار الفاتورة في جدول المراجع وتعبئة مبلغ أقل من المبلغ المستحق.
- بعد الاعتماد تبقى الفاتورة Partly Paid برصيد مفتوح.
- إنشاء سند قبض/دفع من دون ربط بفاتورة محددة.
- يتم تسجيل المبلغ كرصيد مقدم لصالح العميل أو المورد.
- عند إنشاء الفاتورة لاحقًا، يمكن استخدام هذا الرصيد لتسوية جزء من قيمتها.
7.4 التحويلات الداخلية وإدارة الصناديق
كثيرًا ما تحتاج الشركة لتحويل مبالغ بين حسابات داخلية (من بنك إلى بنك، أو من بنك إلى صندوق، أو العكس). بدلًا من إنشاء قيد يدوي، يمكن استخدام Payment Entry – Internal Transfer:
- Paid From = الحساب المحوَّل منه.
- Paid To = الحساب المحوَّل إليه.
- لا يُربط هذا السند بفواتير، لكنه يظهر في دفتر الأستاذ لكل من الحسابين.
8. التقارير الأساسية ومطابقة الحسابات / Core Reports & Reconciliation
جمال موديول المحاسبة في ERPNext لا يكمن فقط في إدخال الحركات، بل في القدرة على قراءة هذه الحركات من خلال تقارير واضحة. في التدريب سنركّز على مجموعة تقارير مركزية:
8.1 دفتر الأستاذ العام (General Ledger)
تقرير General Ledger يعرض جميع القيود التي أثّرت على حساب معين أو مجموعة حسابات خلال فترة زمنية محددة، مع إمكانية التصفية حسب نوع المستند أو الطرف.

من خلال هذا التقرير يمكن للمحاسب:
- تتبع كل حركة مرّت على حساب محدد (مثلاً حساب المبيعات، حساب بنك معيّن أو حساب زبون).
- التحقق من تطابق رصيد الحساب مع ما يظهر في القوائم المالية النهائية.
- استخدام فلاتر التاريخ، نوع المرجع (Ref Type)، والحساب، والعميل/المورد لتضييق النتائج.
8.2 ترتيب القيود داخل دفتر الأستاذ
يتيح التقرير اختيار طريقة ترتيب القيود زمنيًا؛ بحيث يمكن عرض الحركات من الأحدث إلى الأقدم أو بالعكس. عند اختيار عرض Ascending Order تظهر القيود من الأقدم إلى الأحدث، مما يساعد في مراجعة تسلسل الحركات بالتتابع التاريخي.

8.3 تقارير الذمم المدينة والدائنة
- Accounts Receivable: يعرض فواتير العملاء المفتوحة، مبوّبة حسب العمر (من 0 إلى 30 يومًا، 60، 90، الخ).
- Accounts Payable: يعرض التزامات الشركة تجاه الموردين بالطريقة نفسها.
- يمكن استخدام هذه التقارير لاتخاذ قرارات تحصيل أو جدولة دفعات.
8.4 المطابقات البنكية
لإغلاق دورة الحسابات بشكل صحيح، يجب:
- استيراد كشوفات البنك (أو إدخالها يدويًا).
- مطابقة الحركات البنكية مع سندات القبض والدفع داخل النظام.
- التعامل مع الفروقات (عمولات بنكية، فوائد، حركات لم تُسجل بعد) عبر قيود تسوية.
بناء روتين شهري واضح للمطابقة البنكية بحيث يصبح جزءًا ثابتًا من عمل قسم الحسابات، وليس مهمة ثقيلة قبل نهاية السنة فقط.
9. خطة الجلسات التدريبية لموديول المحاسبة / Training Sessions Plan
ليتحوّل هذا المحتوى من نص إلى مهارة عملية، سيتم توزيع تطبيقه على جلسات تدريبية متتابعة. النموذج التالي يوضّح فكرة الخطة التي تعتمدها NEXTFUTURE في أغلب المشاريع:
الجلسة الأولى – الإعدادات الأساسية ومخطط الحسابات
- مراجعة مخطط الحسابات الحالي للشركة.
- إعداد الشركة، السنة المالية، العملات، الضرائب.
- إدخال نموذج لعملاء وموردين وحسابات بنكية.
- تجربة إنشاء أول Journal Entry بسيط للتأكد من سلامة القيود.
الجلسة الثانية – دورة الشراء الكاملة
- إدخال صنف جديد وربطه بالمخزون والحسابات.
- تنفيذ سيناريو Purchase Order → Purchase Receipt → Purchase Invoice → Payment Entry.
- مراجعة أثر كل خطوة على دفتر الأستاذ.
الجلسة الثالثة – دورة البيع الكاملة
- إدخال زبون جديد وسياسة الأسعار والخصومات له.
- تنفيذ سيناريو Sales Order → Delivery Note → Sales Invoice → Payment Entry.
- التعامل مع فاتورة مرتجع (Credit Note) وتأثيرها على المخزون والذمم.
الجلسة الرابعة – التسويات والقيود الخاصة والتقارير
- تسجيل مخصصات، اهتلاكات، وفروق عملة عبر Journal Entry.
- مراجعة التقارير الأساسية ومطابقة الحسابات.
- إنشاء «قائمة فحص شهرية» لمحاسبي الشركة لاستخدامها بعد التدريب.
10. كيف تدعمك NEXTFUTURE بعد انتهاء التدريب؟ / How NEXTFUTURE Supports You After Training
لا ينتهي دور NEXTFUTURE عند آخر جلسة تدريب؛ بل نهدف أن يصبح فريقك قادرًا على تشغيل النظام بثقة. لذلك نلتزم عادةً بالآتي:
- توثيق جميع الأمثلة والسيناريوهات التي تم تنفيذها خلال التدريب في مستند إلكتروني قابل للمشاركة.
- تخصيص وقت لجلسة أسئلة وأجوبة بعد بدء الاستخدام الفعلي بحوالي شهر.
- اقتراح مؤشرات أداء (KPIs) لقسم الحسابات (سرعة إقفال الفترة، نسبة الفواتير غير المسوّاة…إلخ).
- تقديم استشارات إضافية عند الحاجة لتطوير التقارير أو أتمتة المزيد من القيود.
كل شاشة وكل تقرير ستتعرّف عليه خلال هذا الموديول مبني على منطق محاسبي سليم. كلما فهمت العلاقة بين المستند والقيد والتقرير، أصبح ERPNext أداة حقيقية تساعدك على اتخاذ قرار أفضل، وليس مجرد برنامج لإدخال البيانات.
ERPNext Accounts Module – Intro Training Page
This page is a practical introductory guide prepared by NEXTFUTURE to explain the full accounting cycle in ERPNext: from the moment a Purchase Request or Sales Order is created, through invoices, all the way to journal entries, receipts & payments, reports, and bank reconciliation.
The training focuses on hands-on, step-by-step execution in a live ERPNext environment so that trainees understand the complete flow of accounting transactions, not only the data entry screens.
1. What will you learn in this module?
The Accounts module in ERPNext is the backbone of your company’s financial system. Throughout this course, the NEXTFUTURE team will walk you through all key accounting transactions that any sound accounting system must support – and translate them into clear, repeatable steps inside ERPNext.
- Understand the Chart of Accounts and how to read/design an account structure that fits your business.
- Execute the full purchase cycle: from Purchase Request up to Purchase Invoice, Payment Entry, and supplier reconciliation.
- Execute the full sales cycle: from Quotation/Sales Order up to Sales Invoice, Payment Entry, and customer reconciliation.
- Record manual Journal Entries and accounting adjustments (provisions, depreciation, FX differences, etc.).
- Manage cash and bank transactions using Payment Entry for receipts and payments.
- Use the core reports: General Ledger, aging, account balances, and bank-related reports.
- Review and reconcile accounts on a regular basis and understand the impact of each document on the financial statements.
The content is written in a practical training style so that it can serve as a reference after the course, or as the foundation for internal training material inside your company.
2. Financial Document Flow in ERPNext – From Request to Entry
Before diving into individual screens, we need to see the big picture: how financial data moves through the system from the very first step to the final report. You can think of the Accounts module as a stream flowing through the following stages:
- Requests (Purchase Requests, Sales Orders).
- Stock movements (Goods Receipt / Delivery).
- Invoices (Purchase Invoices, Sales Invoices).
- Receipts & payments (Payment Entries).
- Reports & reconciliation (General Ledger, Statements, Bank Reconciliation, etc.).
A very similar flow exists on the sales side: Quotation / Sales Order → Delivery Note → Sales Invoice → Payment Entry. At every stage, ERPNext creates the required accounting entries automatically, keeping balances in sync between Accounts and Stock.
3. Preparing the Accounting Environment Before Posting Transactions
One of the biggest mistakes in any ERP implementation is to start entering invoices and vouchers before making sure the accounting foundation is properly set up. In this section we define what needs to be configured together before day-to-day transactions begin.
3.1 Chart of Accounts
The Chart of Accounts (CoA) is the tree of main and sub-accounts on which all accounting entries are built. ERPNext ships with standard CoA templates (by country or industry), but NEXTFUTURE’s role is to:
- Review your current account structure.
- Propose a simplified, reporting-friendly structure where needed, while respecting legal requirements.
- Map each document type to the right accounts (sales, inventory, cost of goods sold, expenses, etc.).
3.2 Party master data (Customers, Suppliers, Employees)
Before using purchase and sales invoices, we prepare all key party masters:
- Create Customers and link each one to the right receivable account (local, export, etc.).
- Create Suppliers and link each one to the appropriate payable account.
- Define bank and cash accounts inside the Chart of Accounts and map them for use in Payment Entries.
- Set up some employees when you need staff advances or employee receivable/payable accounts.
3.3 General accounting settings
In the initial setup session we will review the most important settings under Accounts Settings and Company, such as:
- Base company currency (e.g. JOD) and default invoice currency.
- Fiscal year configuration and number of periods (annual, quarterly, etc.).
- Default accounts for taxes, discounts, interest, exchange differences, and so on.
- Enabling Multi Currency when the company works with multiple currencies.
4. Purchase Cycle – From Purchase Request to Payment Entry
In this unit, trainees learn how stock or service requirements are converted into fully posted financial documents, and how ERPNext generates the related accounting entries at each step.
4.1 Purchase cycle steps
- Create a Material Request or a direct Purchase Order, depending on your policy.
- Physically receive the items and record them via Purchase Receipt (optional, based on policy).
- Receive the supplier invoice and record it as a Purchase Invoice.
- Settle the invoice using a Payment Entry in cash, cheque, or bank transfer.
4.2 Purchase Invoice
The Purchase Invoice is the key document linking the supplier, inventory and expenses. Once saved and submitted, ERPNext automatically updates supplier balances, inventory, and cost accounts.
4.2.1 Creating a Purchase Invoice – Step by step
- From the module tree, go to Accounting > Accounts Payable > Purchase Invoice.
- Click New to create a new invoice.
- Select the Supplier and make sure address and tax details are fetched correctly.
- Set the Posting Date and Due Date, where applicable.
-
In the Items table, add items or services:
- Select each item from the Item master.
- Enter quantity and rate.
- Select the warehouse into which the items will be received.
- Add taxes and charges in the Taxes and Charges table based on your tax setup.
- Review totals and check all amounts carefully.
- Click Save then Submit to post the invoice and create the GL entry.
Objective: Post a first local supplier invoice with VAT and review its effect on the supplier balance and inventory.
- Supplier: Stationery supplier.
- Item: A4 printer paper – 10 boxes.
- Unit rate: 3 JOD, VAT: 16%, payment terms: credit.
- After submitting, open the General Ledger to view the automatically generated entry.
4.3 Linking receipts to invoices
In companies that follow a “receive first, invoice later” policy, you first create a Purchase Receipt, then generate the Purchase Invoice from that receipt.
- This ensures that billed quantities match what was actually received.
- It reduces the risk of errors in quantities or prices.
- It allows you to record obligations to suppliers even before the physical invoice is issued.
4.4 Payment Entry for Purchase Invoices
Once a Purchase Invoice is submitted, the company owes money to the supplier. When paying, you create a Payment Entry of type Pay and link it to the invoice, which updates the supplier balance and marks the invoice as paid.
5. Sales Cycle – From Sales Order to Customer Receipt
The sales side is the heart of your revenue. In ERPNext, the sales cycle mirrors the purchase cycle, but from the customer’s perspective. Here we will work with documents such as Sales Order, Delivery Note, Sales Invoice, and receipts.
5.1 Sales cycle steps
- Create a Quotation if required, or directly a Sales Order.
- Convert the order into a Delivery Note to confirm goods have been delivered.
- Create a Sales Invoice linked to the order or delivery note.
- Record the received amount via a Payment Entry of type Receive.
5.2 Sales Invoice
Unlike a Purchase Invoice, a Sales Invoice represents a receivable from the customer and revenue for the company. When it is submitted, ERPNext updates Accounts Receivable, Sales, and Inventory accounts.
5.2.1 Creating a Sales Invoice – Step by step
- Go to Accounting > Accounts Receivable > Sales Invoice.
- Click New and choose the Customer to bill.
- Set the Posting Date and Due Date.
-
In the Items table, add the required items or services:
- Select items and quantities.
- Set selling prices and choose the relevant Price List (if applicable).
- Choose the warehouse from which goods will be delivered (if the invoice moves stock).
- Apply taxes and discounts according to your sales policy.
- Review the grand total, then Save and Submit.
- Customer: Local retail shop.
- Item: Display screen – 5 units at 120 JOD each.
- Overall discount: 5% on the invoice, VAT: 16%.
- Payment terms: 30 days, so the invoice remains Unpaid after posting.
- After submission, open the Customer Ledger to see the new customer balance.
5.3 Customer receipts (Payment Entry – Receive)
When a customer pays part or all of the outstanding amount, you create a Payment Entry of type Receive and link it to the invoice. Payment can be in cash, cheque, bank transfer, or through a payment gateway.
During the training, we will distinguish between:
- A receipt linked to a specific invoice (direct settlement of that invoice).
- An Advance receipt recorded before the invoice, and then applied later.
- A general receipt to an account without linking to invoices, and how that appears in reports.
6. Journal Entries & Accounting Adjustments in ERPNext
Although most entries are created automatically from invoices and Payment Entries, there is always a need for manual Journal Entries to handle special adjustments such as provisions, interest, foreign currency differences, and year-end closing entries.
6.1 When do we use a Journal Entry?
- To post opening balances when starting on ERPNext.
- To recognise provisions (e.g. doubtful debts, bonuses, etc.).
- To correct errors in previous entries using proper accounting treatment.
- To record accrued expenses or revenues not yet invoiced.
- To record asset depreciation if the automated Fixed Assets module is not used.
6.2 Key fields in a Journal Entry
- Posting Date – date on which the entry affects the books.
- Reference Number / Date – external reference (cheque, paper voucher, etc.).
- Accounts table – all debit and credit lines.
- User Remark – short description used later for investigation and reporting.
6.3 Example – Provision for doubtful debts
Assume the company decides to create a provision of 5% on a specific customer balance:
- Debit: Expense account for provision for doubtful debts.
- Credit: Provision for doubtful debts account (liability or contra-asset account).
- Open Journal Entry from the Accounts module.
- Choose entry type as a normal Journal Entry.
- Enter the expense account as Debit and the provision account as Credit with the provision amount.
- Write a clear User Remark, e.g. “Provision for customer X at 5%”.
- Save and submit, then review the effect in the Trial Balance.
6.4 FX differences & revaluation
For companies dealing in multiple currencies, you will use special entries to record FX differences at settlement or at period end. In the training we will discuss:
- The difference between realised Exchange Gain or Loss on actual payment and Exchange Rate Revaluation at period end.
- How FX differences appear in the Income Statement.
- Best practices to minimise the number of manual entries by leveraging ERPNext settings.
7. Cash Management – Receipts & Payments (Payment Entry)
The Payment Entry document is the link between invoices and cash/bank accounts. It is the primary tool used to settle invoices and close open receivables and payables.
7.1 Payment Entry types
- Receive – money received from a customer or other party.
- Pay – money paid to a supplier or other party.
- Internal Transfer – transfers between internal accounts (e.g. from cash to bank).
7.2 Key fields in Payment Entry
- Party Type and Party (Customer, Supplier, Employee, etc.).
- Paid From account (for Pay entries) or Paid To (for Receive entries).
- Currency, amount, and exchange rate if account currency differs from invoice currency.
- The References table that links the payment to open invoices.
7.3 Training scenarios for Payment Entry
- Entry type: Pay.
- Party Type = Supplier; select the supplier.
- Paid From = bank account, Paid To = payable/party account.
- Use the References table to pull open invoices and select a full payment.
- Submit, then review the supplier’s balance in the Supplier Ledger.
- Entry type: Receive.
- Select the customer and the receiving account (cash box or bank).
- Choose the invoice in the References table and enter an amount lower than the outstanding.
- After submission, the invoice remains Partly Paid with an open balance.
- Create a receipt/payment without linking it to any invoice.
- The amount is recorded as an advance balance for the customer or supplier.
- When an invoice is created later, this advance can be applied as part of the payment.
7.4 Internal transfers & cash management
Companies frequently transfer amounts between internal accounts (bank to bank, bank to cash, or vice versa). Instead of a manual Journal Entry, you can use Payment Entry – Internal Transfer:
- Paid From = source account.
- Paid To = destination account.
- No invoices are linked, but the movement appears in the General Ledger for both accounts.
8. Core Reports & Account Reconciliation
The real power of the Accounts module in ERPNext lies not only in recording transactions, but in the ability to read them through clear, flexible reports. In this module we focus on a set of core reports:
8.1 General Ledger
The General Ledger report shows all entries posted to a specific account or group of accounts over a given period, with filters for document type and party.
Using this report, the accountant can:
- Trace all movements affecting a specific account (e.g. a sales account, a given bank account, a customer account).
- Verify that account balances match the figures in the final financial statements.
- Filter by date range, reference type, account, customer/supplier and more.
8.2 Ordering of entries in the GL
The report allows you to choose how entries are ordered in time: from newest to oldest, or the opposite. When you select Ascending Order, entries are shown from oldest to newest, which makes it easier to review the chronological sequence of movements.
8.3 Receivables and payables reports
- Accounts Receivable: shows open customer invoices, usually grouped by aging buckets (0–30 days, 60, 90, etc.).
- Accounts Payable: shows the company’s obligations to suppliers in a similar way.
- These reports support decisions on collection actions and payment scheduling.
8.4 Bank reconciliation
To correctly close the accounting cycle, you should:
- Import bank statements (or enter them manually).
- Match bank movements with Payment Entries in ERPNext.
- Handle differences (bank fees, interest, unrecorded transactions) through adjustment entries.
9. Training Sessions Plan for the Accounts Module
To turn this content from text into practical skills, the work will be distributed across several training sessions. The following model illustrates the typical plan used by NEXTFUTURE in most projects:
Session 1 – Basic setup & Chart of Accounts
- Review the company’s existing Chart of Accounts.
- Configure Company, Fiscal Year, currencies, and tax settings.
- Enter sample customers, suppliers, and bank accounts.
- Create a first simple Journal Entry to confirm postings are correct.
Session 2 – Full purchase cycle
- Create a new item and link it to stock and accounts.
- Execute the scenario Purchase Order → Purchase Receipt → Purchase Invoice → Payment Entry.
- Review the effect of each step in the General Ledger.
Session 3 – Full sales cycle
- Create a new customer with specific pricing/discount policies.
- Execute the scenario Sales Order → Delivery Note → Sales Invoice → Payment Entry.
- Handle a sales return (Credit Note) and review its impact on stock and receivables.
Session 4 – Adjustments, special entries & reports
- Post provisions, depreciation, and FX differences using Journal Entry.
- Review the main reports and perform account reconciliation.
- Build a monthly “closing checklist” for your Accounts team to use after training.
10. How NEXTFUTURE Supports You After Training
NEXTFUTURE’s role does not end with the last training session. Our goal is to enable your team to run the system confidently. Therefore, we usually commit to the following:
- Document all examples and scenarios used during training in a shareable electronic guide.
- Schedule a Q&A follow-up session around one month after go-live to address real-life questions.
- Suggest practical KPIs for the Accounts team (closing speed, percentage of unreconciled invoices, etc.).
- Provide additional consulting where needed to enhance reports or automate more accounting processes.
Every screen and every report you will see in this module is built on sound accounting logic. The more you understand the relationship between the document, the GL entry, and the report, the more ERPNext becomes a decision-making tool – not just a data entry program.