دورة تدريب موديول التصنيع في ERPNext
هذه الصفحة هي مادة تدريبية جاهزة لمتدربي NEXTFUTURE، لشرح دورة التصنيع الكاملة في ERPNext؛ من تعريف المواد وBill of Materials، مرورًا بالتخطيط وأوامر الإنتاج وJob Cards، وصولًا إلى حركات المخزون والتقارير.
التركيز على التطبيق العملي خطوة بخطوة داخل النظام، مع ربط كل شاشة بمثال حقيقي من أرض المصنع.
1. مقدّمة عن موديول التصنيع في ERPNext
موديول التصنيع في ERPNext يربط بين المواد الخام وخط الإنتاج و المنتج النهائي بشكل متكامل. الهدف من هذه الدورة أن يفهم المتدرب تسلسل العمل من تعريف المادة وحتى إدخال التشغيلة الجاهزة للمخزون مع تكلفة واضحة ورقم Batch يمكن تتبّعه.
- تعريف المواد الخام والمنتجات الجاهزة مع UOM، باركود، Batch، وصورة المنتج.
- بناء Bill of Materials (BOM) وربطها بالعمليات وWorkstations.
- إعداد Production Plan وWork Orders حسب احتياجات المبيعات.
- إدارة Job Cards وتتبع الوقت والتكلفة على مستوى كل عملية.
- تنفيذ حركات المخزون الخاصة بالإنتاج: Transfer to WIP، Manufacture، Scrap.
- التعامل مع الفاقد والهالك وضبط التأثير على التكلفة والمخزون.
- استخدام أهم تقارير التصنيع لمتابعة الطاقة الإنتاجية والتكلفة.
2. تحضير المواد للتصنيع: Item, UOM, Barcode, Batch
قبل البدء في أوامر الإنتاج، يجب أن تكون المواد مُعرَّفة بشكل صحيح. في ERPNext، كل مادة هي Item يمكن أن تكون خام، نصف مصنَّعة، أو منتج نهائي.
2.1 الوصول إلى شاشة Item
من شجرة الوحدات اختر: Home > Stock > Items أو عبر مربع البحث Global Search بكتابة Item.

2.2 الحقول الأساسية في بطاقة المادة للتصنيع
- Item Code / Item Name: كود المادة واسمها كما سيظهر في كل المستندات.
- Item Group: مجموعة المواد (مواد خام، مواد تغليف، منتجات جاهزة...).
- Default Unit of Measure (UOM): وحدة القياس الافتراضية (KG, PCS, LTR...).
- Maintain Stock: تفعيل هذا الخيار للمواد التي تظهر في المخزون.
- Include Item in Manufacturing: لتحديد أن المادة تُستخدم في التصنيع أو ناتج عن التصنيع.
2.3 تعريف وحدات القياس (UOM) والتحويلات
في الصناعات الحقيقية قد نستقبل المواد بوحدة ونستهلكها بأخرى (مثل: كرتون → كيس → كيلو). في ERPNext يمكن تعريف وحدات قياس متعددة مع نسب التحويل بينها.
- اذهب إلى Home > Stock > Setup > UOM.
- عرّف UOMs مثل: KG، Bag، Carton.
- من داخل المادة (Item) افتح جدول UOMs وحدد نسب التحويل (مثلاً: 1 Carton = 10 KG).
2.4 الباركود (Barcode) وBatch / Serial
- في تبويب Barcode يمكنك إدخال باركود واحد أو أكثر للمادة (للتعامل مع أجهزة القراءة).
- في تبويب Inventory فعّل:
- Has Batch No: إذا كانت المادة تُدار بالتشغيلات (مثل مسحوق، خلطة، إنتاج غذائي).
- Has Serial No: إذا كانت المادة تُدار بأرقام تسلسلية (مثل أجهزة إلكترونية).
- يمكن ربط Batch Date وExpiry Date إذا كانت هناك صلاحية للمادة.
2.5 إضافة صورة للمنتج
في نفس شاشة المادة، استخدم حقل Image لإرفاق صورة من جهازك أو من الملفات الموجودة في النظام. تظهر الصورة لاحقًا في التقارير وJob Cards لمساعدة فريق الإنتاج على تمييز المواد بصريًا.
3. تعريف مراكز العمل (Workstation) والعمليات (Operation) ومسار التصنيع
قبل بناء BOM بدقة، يجب تعريف العمليات التي يمر بها المنتج و مراكز العمل (Workstations) التي تُنفَّذ فيها هذه العمليات.
3.1 تعريف Workstation
من المسار: Home > Manufacturing > Bill of Materials > Workstation
- Workstation Name: اسم خط الإنتاج أو الماكينة (مثل: Mixer-1، Oven-2).
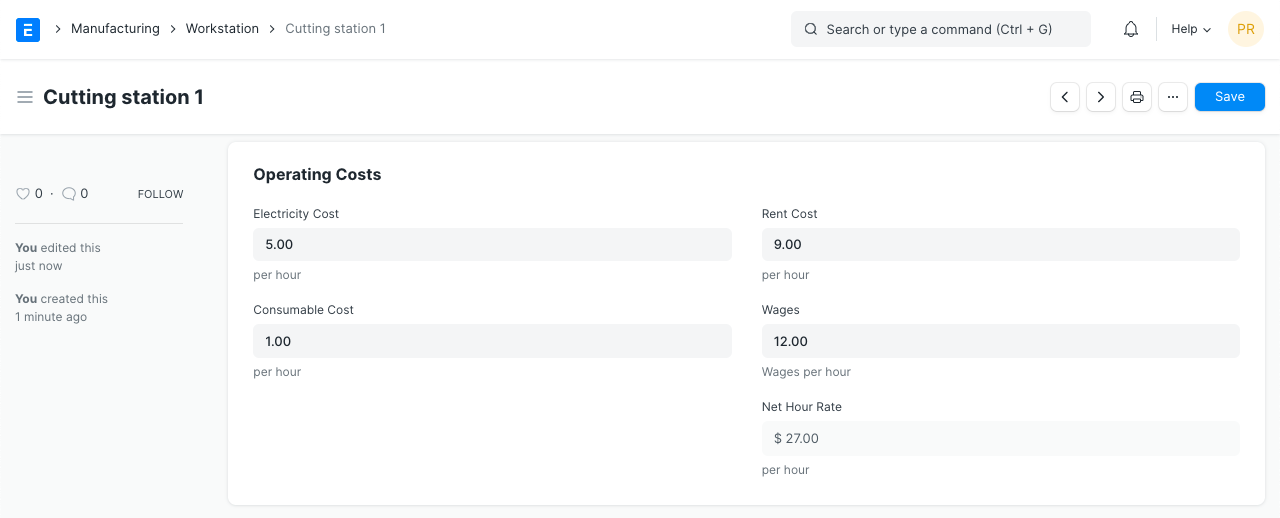
- Operating Costs: إدخال التكاليف التقديرية (كهرباء، إيجار، أجور، مواد مساعدة...).
- Holiday List: لاستثناء أيام العطل من حساب القدرة الإنتاجية.
3.2 تعريف Operations
Operation هي خطوة عمل مثل “خلط”، “تعبئة”، “خبز”، “لحام”... تُسجَّل فيها مدة التشغيل. المسار: Home > Manufacturing > Bill of Materials > Operation
- تحديد اسم العملية (مثلاً: Mixing, Filling, Packing).
- تحديد معدل الزمن لكل وحدة إنتاجية (Operation Time) إن أمكن.
- ربط العملية بمركز عمل أو أكثر لاحقًا في BOM وRouting.
3.3 Routing (اختياري لكن مفيد)
Routing يحدد تسلسل العمليات التي يمر بها المنتج. يمكن تعريف Routing واحد لكل نوع منتج.
- اذهب إلى Home > Manufacturing > Bill of Materials > Routing.
- أنشئ Routing جديد، وأضف العمليات بالترتيب مع Workstation لكل عملية.
- استخدم هذا Routing في BOM بدلاً من إدخال العمليات مباشرةً داخل BOM.
4. تعريف Bill of Materials (BOM) للمنتج
Bill of Materials (BOM) هي قلب موديول التصنيع؛ تُحدّد المواد الخام والعمليات المطلوبة لإنتاج كمية معيّنة من المنتج النهائي.
4.1 إنشاء BOM جديد
- اذهب إلى Home > Manufacturing > Bill of Materials > Bill of Materials.
- اضغط New واختر Item النهائي المراد إنتاجه (مثلاً: Chocolate Cake 1kg).
- حدد Quantity (كمية الإنتاج القياسية، مثل 1 KG أو 100 PCS).
- في جدول Items أضف المواد الخام والكميات لكل وحدة إنتاجية.
- إن كنت تستخدم Routing، اختره في حقل Routing أو أضف العمليات يدويًا في جدول Operations.
4.2 الحقول المهمة داخل BOM
- Is Active: لتفعيل أو تعطيل استخدام هذه الـBOM.
- Is Default: لتكون الـBOM الافتراضية في أوامر الإنتاج لهذا المنتج.
- With Operations: لتفعيل ارتباط الـBOM بالعمليات وJob Cards.
- Scrap Items: لتحديد المواد التي تعتبر فاقد (Scrap) ونسبة الفاقد.
4.3 تسعير التكلفة من BOM
عند حفظ واعتماد BOM، يقوم النظام بحساب تكلفة الإنتاج المتوقعة اعتمادًا على:
- تكلفة المواد الخام (من تقييم المخزون).
- تكاليف العمليات (Operation Cost) المرتبطة بالـWorkstations.
- أي نسب فاقد (Scrap) تم تعريفها.
5. التخطيط للإنتاج باستخدام Production Plan
Production Plan تجمّع احتياجات الإنتاج من أكثر من مصدر (طلبات مبيعات، Material Request، تقدير يدوي) وتحوّلها إلى أوامر إنتاج (Work Orders).
5.1 إنشاء Production Plan جديد
- اذهب إلى Home > Manufacturing > Production > Production Plan.
- أنشئ خطة جديدة وحدد المصدر:
- Get Items From = Sales Order للحصول على الأصناف من طلبات المبيعات.
- أو Get Items From = Material Request في حال وجود طلبات تصنيع من الأقسام الأخرى.
- اضبط الكميات وتواريخ الحاجة Required By Date لكل صنف.
5.2 توليد طلبات المواد وأوامر الإنتاج
من داخل Production Plan، يمكن تنفيذ:
- Get Material Requirements لحساب احتياج المواد الخام بناءً على BOM.
- Create Material Requests لرفع طلبات شراء أو نقل مواد.
- Create Work Orders لإنشاء أوامر الإنتاج لكل صنف جاهز.
6. أوامر الإنتاج (Work Order) في ERPNext
Work Order هو مستند يَصدر من قسم التخطيط إلى أرض المصنع يحدد المنتج المطلوب وكميته وموقع الإنتاج والمواد والعمليات المطلوبة.
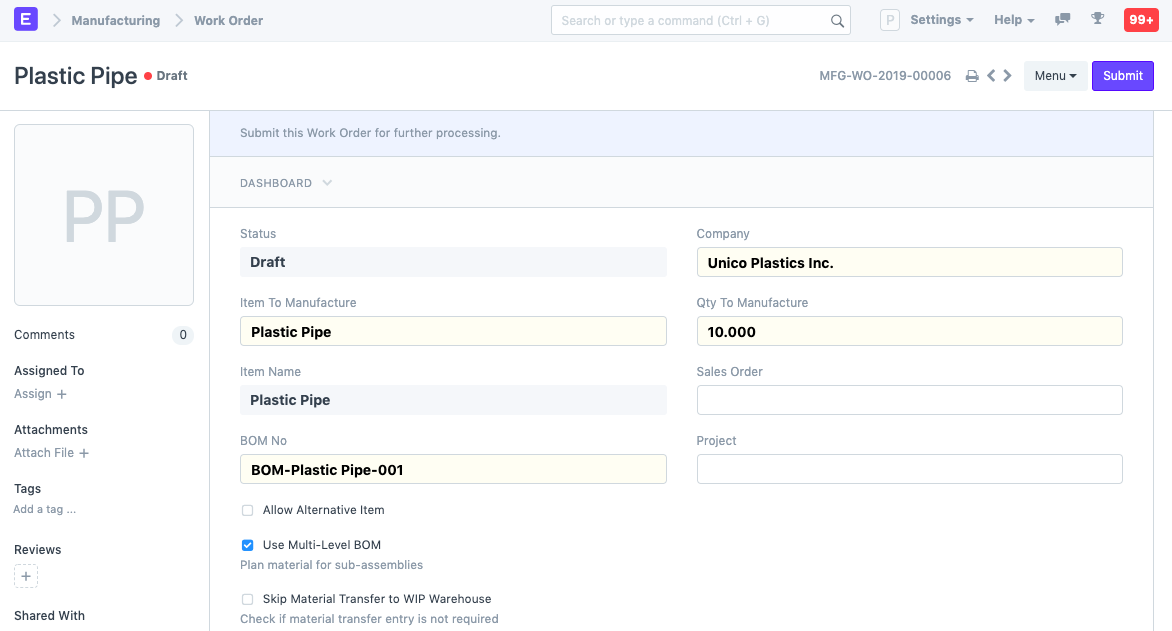
6.1 إنشاء Work Order
- اذهب إلى Home > Manufacturing > Production > Work Order.
- اضغط New ثم:
- اختر Item to Manufacture.
- تأكد من جلب Default BOM الصحيح.
- أدخل Quantity to Manufacture.
- حدد Source Warehouse (مستودع المواد الخام) و WIP Warehouse وTarget Warehouse (المنتج الجاهز).
- احفظ Work Order ثم اعتمده Submit لبدء دورة الإنتاج.
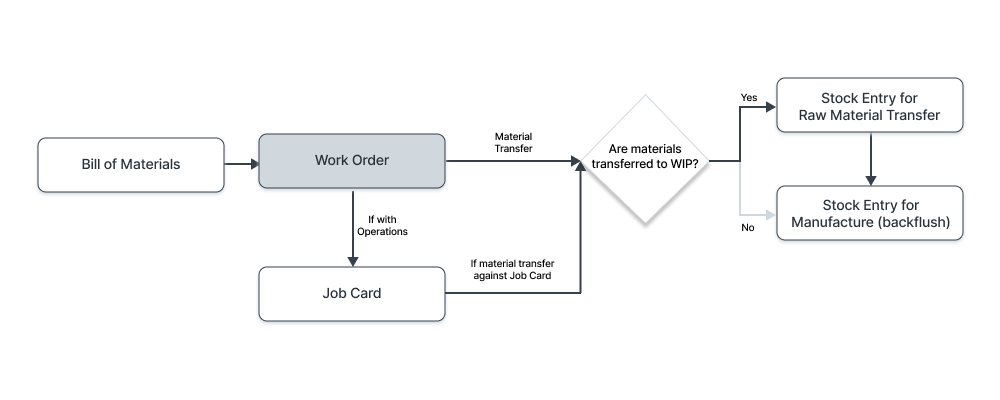
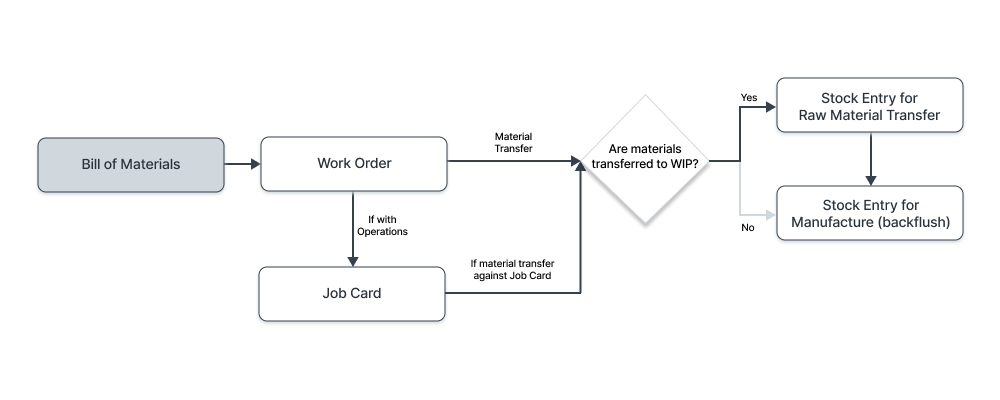
6.2 خيارات نقل المواد
- Transfer Material Against = Work Order: نقل المواد دفعة واحدة من مخزن المواد إلى WIP.
- Transfer Material Against = Job Card: نقل المواد حسب كل عملية/Job Card.
في المشاريع الصغيرة يمكن الاكتفاء بنقل المواد مباشرة من مستودع المواد إلى مستودع المنتج الجاهز باستخدام Backflush، بينما في المصانع الأكبر يفضَّل استخدام مستودع WIP وتعقب مواد كل عملية.
7. Job Card: تتبع العمليات على أرض المصنع
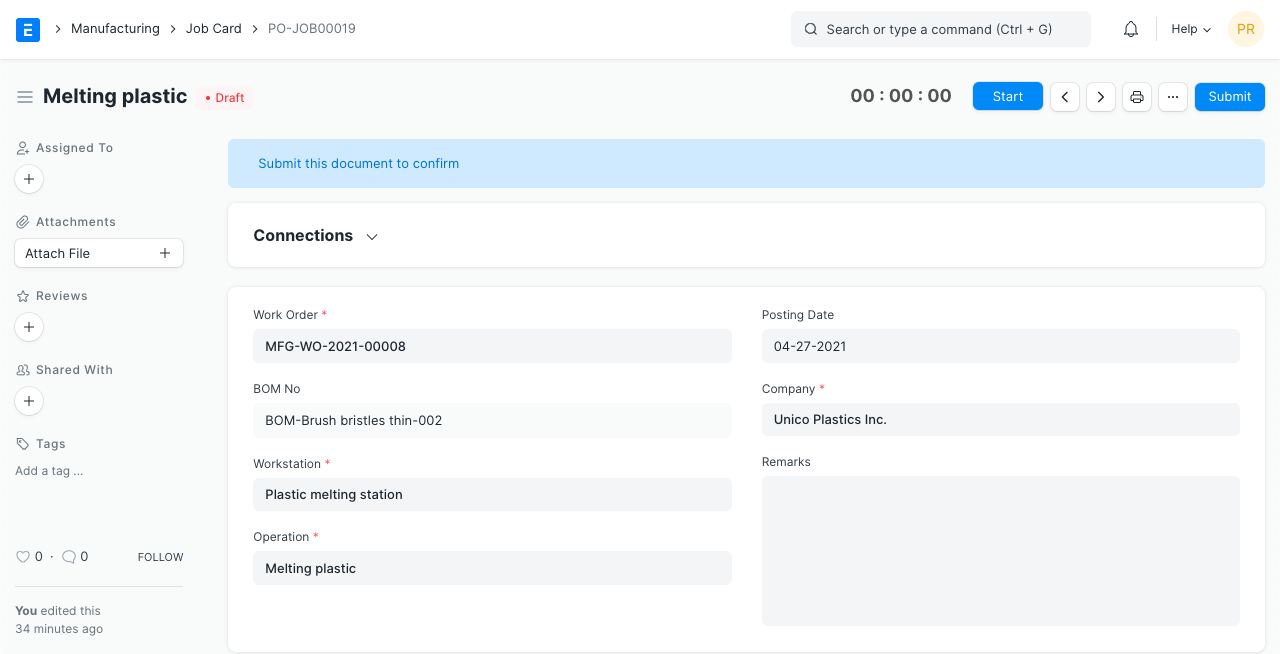
Job Card يخزن المعلومات الفعلية لكل عملية (Operation) على Workstation معيّنة: وقت التشغيل، الموظفين، والكميات المنتجة أو التالفة.
7.1 إنشاء Job Cards من Work Order
عند اعتماد Work Order يحتوي على عمليات (من BOM أو Routing)، يقوم النظام تلقائيًا بإنشاء Job Cards لكل عملية.
- افتح Work Order جاهز.
- من قائمة الإجراءات اختر Create > Job Cards (إن لم تُنشأ تلقائيًا).
- يتم توليد Job Card لكل Operation مع Workstation والكمية المطلوب إنتاجها.
7.2 استخدام Job Card في أرض المصنع
- المشغّل يفتح Job Card ويضغط Start Job عند بداية العملية.
- بعد الانتهاء يضغط Complete Job ويُدخل:
- الكمية المنتجة.
- أي كمية تالفة (Scrap / Rejected).
- مدة التشغيل الفعلية (إن لم تُحسب تلقائيًا).
- يتحدث Work Order تلقائيًا بنسبة الإنجاز لكل عملية.
- حدد Work Order لمنتج جاهز (مثلاً: خليط كيك 1000 كغ).
- افتح Job Card لعملية Mixing على Workstation المناسب.
- ابدأ المهمة ثم أنهِها بعد إدخال الكمية المنجزة ومدة التشغيل.
- راجِع Work Order وتحقق من تحديث نسبة الإنجاز.
8. حركات المخزون في دورة التصنيع (Stock Entry)
أثناء التصنيع يتم استخدام مستند Stock Entry لنقل المواد الخام وإدخال المنتج الجاهز ومعالجة الفاقد.
8.1 الأنواع الرئيسية لـ Stock Entry في التصنيع
- Material Transfer: نقل المواد من مستودع المواد الخام إلى مستودع WIP أو بين المستودعات.
- Manufacture: خصم المواد الخام وإضافة المنتج النهائي (مع Batch) بناءً على Work Order.
- Material Transfer for Manufacture: نقل المواد لتحضيرها للإنتاج ثم عمل حركة Manufacture لاحقًا.
- Material Receipt / Issue: لاستلام أو إخراج مواد خارج سياق Work Order (يُستخدم بحذر).
- Repack: لتغيير شكل التعبئة دون تغيير طبيعة المادة (مثل: من كيس إلى كرتون).
8.2 إنشاء حركة Manufacture من Work Order
- افتح Work Order في حالة In Progress.
- من الزر Create اختر Stock Entry.
- عيّن Purpose = Manufacture.
- سيجلب النظام:
- المواد الخام في جدول Items مع الكميات المطلوبة.
- المنتج النهائي في الصف الأخير مع مستودع Target Warehouse.
- إن كانت المادة تستخدم Batch، اختر أو أنشئ Batch جديد للمنتج النهائي.
- احفظ واعتمد الحركة لمحاسبة المخزون والتصنيع.
8.3 نقل المواد إلى مستودع WIP
في المصانع التي تعتمد WIP Warehouse مستقل، يتم أولًا عمل:
- Stock Entry بنوع Material Transfer من مستودع المواد إلى WIP.
- ثم Stock Entry بنوع Manufacture يخصم من WIP ويضيف المنتج النهائي.
9. التعامل مع الفاقد (Scrap) والهالك وضبط الجودة
لا يوجد إنتاج بلا فاقد. المهم هو تسجيل الفاقد بشكل صحيح حتى لا تختفي المواد من دون أثر محاسبي.
9.1 تعريف Scrap في BOM
- في جدول Scrap Items داخل BOM يمكن تحديد:
- المادة التي تعتبر فاقد (مثل قصاصات معدن، بقايا تعبئة).
- نسبة الفاقد المتوقعة من كمية الإنتاج.
- يمكن ربط Scrap Warehouse منفصل لتجميع الفاقد فيه.
9.2 تسجيل الفاقد الفعلي في Job Card أو Stock Entry
أثناء إنهاء Job Card يمكن إدخال كمية تالفة (Rejected Quantity) أو كمية Scrap. كما يمكن في Stock Entry من نوع Manufacture تعديل الكميات لإظهار الفرق بين المتوقع والفعلية.
9.3 معالجة التلف أو الفاقد غير المرتبط بإنتاج
- استخدم Stock Entry > Purpose = Material Issue لإخراج مواد تالفة من المخزون.
- أو استخدم Stock Reconciliation لتسوية مخزون بعد جرد فعلي.
- يجب أن تُراجع هذه الحركات محاسبيًا لأنها تؤثر على تكلفة البضاعة المباعة (COGS).
10. التقارير الرئيسية وخطة الجلسات التدريبية
10.1 أهم تقارير موديول التصنيع
- Open Work Orders: لمتابعة أوامر الإنتاج المفتوحة وحالتها.
- Production Analytics: تحليل كميات الإنتاج حسب المنتج أو الفترة.
- BOM Explosion: لعرض كل المواد الداخلة في منتج معين عبر BOM متعددة المستويات.
- Capacity Utilization: لمراقبة استغلال Workstations وأوقات التشغيل.
- Job Card Summary: لتتبع الوقت والتكلفة على مستوى العمليات.
10.2 خطة جلسات تدريب موديول التصنيع
يمكن تقسيم التدريب العملي على أربع جلسات رئيسية:
- الجلسة الأولى: تعريف المواد، UOM، Item Groups، Batch / Barcode.
- الجلسة الثانية: Workstations، Operations، BOM، Routing وبناء تكلفة المنتج.
- الجلسة الثالثة: Production Plan، Work Orders، Job Cards، وحركات Stock Entry.
- الجلسة الرابعة: الفاقد والهالك، ضبط الجودة، التقارير والتحليل، وربط التصنيع بالمحاسبة.
كل خطوة في موديول التصنيع – من تعريف المادة وحتى التقارير – مرتبطة بباقي الوحدات. كلما فهمت العلاقة بين BOM وWork Order وStock Entry، أصبح ERPNext أداة حقيقية لإدارة مصنعك وليس مجرد برنامج لإدخال الكميات.
ERPNext Manufacturing Module – Training Course
This page is a ready-made training material for NEXTFUTURE trainees, explaining the full manufacturing cycle in ERPNext – from item and Bill of Materials definition, through planning, Work Orders and Job Cards, all the way to stock movements and reports.
The focus is on practical, step-by-step work inside the system, connecting every screen with a real-life shop-floor example.
1. Introduction to the Manufacturing Module in ERPNext
The Manufacturing module in ERPNext connects raw materials, the production line, and the finished product in an integrated way. The goal of this course is to help trainees understand the full sequence – from defining the item until posting the finished batch to stock with a clear cost and traceable batch number.
- Define raw materials and finished goods with UOM, barcode, Batch, and product image.
- Build a detailed Bill of Materials (BOM) and link it to operations and Workstations.
- Configure Production Plan and Work Orders based on Sales demand.
- Manage Job Cards and track time and cost per operation.
- Execute manufacturing stock movements: Transfer to WIP, Manufacture, and Scrap.
- Handle scrap and wastage correctly and control their impact on cost and stock.
- Use key manufacturing reports to monitor capacity and production cost.
2. Preparing Items for Manufacturing: Item, UOM, Barcode, Batch
Before you start creating Work Orders, items must be defined correctly. In ERPNext, every material is an Item which can be a raw material, semi-finished, or finished product.
2.1 Accessing the Item screen
From the module tree: Home > Stock > Items or via Global Search by typing Item.
2.2 Key item fields for manufacturing
- Item Code / Item Name: How the item will appear on all documents.
- Item Group: Category (Raw Materials, Packing Materials, Finished Goods, etc.).
- Default Unit of Measure (UOM): Main unit for the item (KG, PCS, LTR, etc.).
- Maintain Stock: Enable this for items that should appear in inventory.
- Include Item in Manufacturing: Mark if the item is used in, or produced by, manufacturing.
2.3 Defining UOMs and conversions
In real life, materials might be received in one unit and consumed in another (e.g., Carton → Bag → KG). ERPNext lets you define multiple UOMs and conversion factors.
- Go to Home > Stock > Setup > UOM.
- Define UOMs such as KG, Bag, and Carton.
- In the Item, open the UOMs table and set conversion factors (e.g. 1 Carton = 10 KG).
2.4 Barcode and Batch / Serial
- In the Barcode section, you can add one or more barcodes for scanner use.
- In the Inventory section, enable:
- Has Batch No: For items managed by batches (powders, blends, food production, etc.).
- Has Serial No: For items managed by serial numbers (electronics, machines, etc.).
- You can link a Batch Date and Expiry Date if the item has a shelf life.
2.5 Adding a product image
In the Item form, use the Image field to upload a picture from your device or existing files. This image will appear in reports and Job Cards to help operators visually identify the item.
3. Defining Workstations, Operations, and Routing
Before building a complete BOM, you should define the Operations the product goes through and the Workstations where these operations are executed.
3.1 Defining Workstations
Navigation: Home > Manufacturing > Bill of Materials > Workstation
- Workstation Name: Name of the line or machine (Mixer-1, Oven-2, etc.).
- Operating Costs: Estimated costs (power, rent, labor, auxiliaries, etc.).
- Holiday List: Used to exclude holidays from capacity calculations.
3.2 Defining Operations
An Operation is a step like “Mixing”, “Filling”, “Baking”, or “Welding”. Navigation: Home > Manufacturing > Bill of Materials > Operation
- Set the operation name (e.g., Mixing, Filling, Packing).
- Define standard time per unit (Operation Time) if applicable.
- Later, link each operation to one or more Workstations in BOM or Routing.
3.3 Routing (optional but very useful)
Routing defines the ordered sequence of Operations for a product. You can have one routing per product type.
- Go to Home > Manufacturing > Bill of Materials > Routing.
- Create a new Routing and add Operations in sequence, each linked to its Workstation.
- Use this Routing in the BOM instead of manually entering operations inside the BOM.
4. Defining the Bill of Materials (BOM)
The Bill of Materials (BOM) is the heart of the Manufacturing module. It defines the materials and operations required to produce a specific quantity of the finished product.
4.1 Creating a new BOM
- Go to Home > Manufacturing > Bill of Materials > Bill of Materials.
- Click New and select the finished Item (e.g., Chocolate Cake 1kg).
- Set the standard Quantity (e.g. 1 KG or 100 PCS).
- In the Items table, add raw materials and quantities per produced unit.
- If you use Routing, select it in Routing or add operations directly in the Operations table.
4.2 Important fields in BOM
- Is Active: Enable or disable the BOM.
- Is Default: Set as the default BOM for this item in Work Orders.
- With Operations: Activate link between BOM and Job Cards / Operations.
- Scrap Items: Define scrap materials and expected scrap percentages.
4.3 Costing from BOM
When you save and submit a BOM, ERPNext calculates the expected manufacturing cost based on:
- Material costs (from stock valuation).
- Operation costs linked to Workstations.
- Any defined scrap rates.
5. Planning Production with Production Plan
A Production Plan aggregates production requirements from multiple sources (Sales Orders, Material Requests, or manual estimates) and converts them into Work Orders.
5.1 Creating a new Production Plan
- Go to Home > Manufacturing > Production > Production Plan.
- Create a new plan and choose the source:
- Get Items From = Sales Order to pull items from approved sales.
- Get Items From = Material Request if manufacturing requests come from other departments.
- Adjust quantities and Required By Date per item.
5.2 Material requirements and Work Orders
From inside a Production Plan, you can:
- Run Get Material Requirements to calculate raw material needs based on BOM.
- Create Material Requests for purchasing or internal transfers.
- Create Work Orders for each finished item.
6. Work Orders in ERPNext
A Work Order is the document that flows from planning to the shop floor. It defines the product to be manufactured, its quantity, production location, required materials, and operations.
6.1 Creating a Work Order
- Go to Home > Manufacturing > Production > Work Order.
- Click New and:
- Choose Item to Manufacture.
- Ensure the correct Default BOM is selected.
- Enter Quantity to Manufacture.
- Set Source Warehouse (raw materials), WIP Warehouse, and Target Warehouse (finished goods).
- Save and Submit the Work Order to start the production cycle.
6.2 Material transfer options
- Transfer Material Against = Work Order: Transfer all required materials at once to WIP.
- Transfer Material Against = Job Card: Transfer materials per operation / Job Card.
For small implementations, you may move materials directly from the raw materials warehouse to the finished goods warehouse using Backflush. In larger plants, it is recommended to use a dedicated WIP warehouse and track materials per operation.
7. Job Cards – Tracking operations on the shop floor
A Job Card stores the actual details of each operation on a specific Workstation: runtime, operators, produced quantity, and scrap.
7.1 Creating Job Cards from a Work Order
When you submit a Work Order that has operations (from BOM or Routing), ERPNext can automatically create Job Cards for each operation.
- Open a submitted Work Order.
- From the action menu choose Create > Job Cards (if not already created).
- A Job Card is generated for every Operation with its Workstation and planned quantity.
7.2 Using Job Cards on the shop floor
- The operator opens the Job Card and clicks Start Job when the operation begins.
- When finished, they click Complete Job and enter:
- Completed quantity.
- Any rejected or scrap quantity.
- Actual runtime (if not captured automatically).
- The Work Order is automatically updated with progress against each operation.
- Choose a Work Order for a finished product (e.g., Cake Mix 1000 KG).
- Open the Job Card for the Mixing operation on the relevant Workstation.
- Start the job, then complete it with actual quantities and time.
- Review the Work Order and confirm that progress has been updated.
8. Stock Movements in the Manufacturing Cycle (Stock Entry)
During manufacturing, the Stock Entry document is used to transfer raw materials, post finished goods, and handle scrap and WIP movements.
8.1 Main Stock Entry types for manufacturing
- Material Transfer: Move materials from raw materials warehouse to WIP or between warehouses.
- Manufacture: Consume raw materials and post finished goods (with batch) based on a Work Order.
- Material Transfer for Manufacture: Prepare materials for production and manufacture later.
- Material Receipt / Issue: Receive or issue materials outside Work Orders (use with care).
- Repack: Change packaging without changing the item itself (e.g., from bag to carton).
8.2 Creating a Manufacture Stock Entry from a Work Order
- Open a Work Order in In Progress state.
- From Create, choose Stock Entry.
- Set Purpose = Manufacture.
- ERPNext will automatically:
- List raw materials in the Items table with required quantities.
- Add the finished item as the last row with the Target Warehouse.
- If the item is batch-managed, select or create a new Batch for the finished goods.
- Save and submit the Stock Entry to update inventory and manufacturing accounting.
8.3 Moving materials to WIP
In plants that use a dedicated WIP warehouse, you typically:
- Create a Material Transfer Stock Entry from raw materials warehouse to WIP.
- Then create a Manufacture Stock Entry consuming from WIP and posting finished goods.
9. Handling Scrap, Wastage, and Quality
There is no production without scrap. The key is to record scrap correctly so that materials do not “disappear” without a proper accounting impact.
9.1 Defining Scrap in the BOM
- In the Scrap Items table of the BOM, you can define:
- Which item is considered scrap (metal offcuts, packing leftovers, etc.).
- The expected scrap percentage for the production quantity.
- You may link a separate Scrap Warehouse to accumulate scrap items.
9.2 Recording actual scrap in Job Card or Stock Entry
When completing a Job Card, you can enter rejected quantity or scrap. Also, in a Manufacture Stock Entry, you can adjust quantities to reflect the difference between expected and actual consumption or output.
9.3 Handling non-production damage or loss
- Use Stock Entry > Purpose = Material Issue to write off damaged stock.
- Or use Stock Reconciliation after a physical count.
- These entries should be reviewed by accounting since they affect COGS and stock valuation.
10. Key Reports and Training Session Plan
10.1 Core manufacturing reports
- Open Work Orders: Follow up all open Work Orders and their status.
- Production Analytics: Analyze production quantities by item or period.
- BOM Explosion: Show all materials involved in a product across multi-level BOMs.
- Capacity Utilization: Monitor Workstation usage and runtime.
- Job Card Summary: Track time and cost per operation.
10.2 Suggested practical training plan
You can split the manufacturing training into four main hands-on sessions:
- Session 1: Items, UOMs, Item Groups, Batch / Barcode.
- Session 2: Workstations, Operations, BOM, Routing and product costing.
- Session 3: Production Plan, Work Orders, Job Cards, and Stock Entries.
- Session 4: Scrap & Quality, analysis reports, and integration with Accounting.
Every step in the Manufacturing module – from Item definition to reports – is connected to other modules. The more you understand the relationships between BOM, Work Order, and Stock Entry, the more ERPNext becomes a real factory management tool, not just a data entry system.